How to Connect Your Amazon Vendor Central Account with SellerMate.AI
- Rushikesh Taralekar
- Apr 1
- 2 min read

If you're managing your Amazon ads with SellerMate.ai and want to enhance your data visibility and performance insights, connecting your Amazon Vendor Central account is a great next step. In this guide, we'll walk you through the simple process of linking your Vendor Central account with SellerMate.ai.
Looking to connect your Seller Central account instead? Read our step-by-step guide here.
Why Connect Vendor Central to SellerMate.ai?
By connecting your Vendor Central account, you unlock deeper insights, streamlined reporting, and better attribution between your ads data and vendor sales data — all in one unified dashboard.
Step-by-Step Guide to Connect Vendor Central
1. Go to Your Amazon Accounts Page
Log in to your SellerMate.ai dashboard and navigate to the Amazon Accounts section.

2. Click "Add Vendor Central"
Here, you’ll see an option to Add Vendor Central. Click the button to begin the process.
3. Select the Ad Account to Link
You'll be prompted to choose which ad account you want to link this Vendor Central account to. Make your selection before moving forward.

⚠ Important Note Before Proceeding
If you're already logged into any Amazon account in your browser, Amazon might automatically connect the currently active Vendor Central account, even if it's not the one you intended.
To avoid this:
Use Incognito mode for Vendor Central connection process.

4. Log in to Amazon Vendor Central
Once redirected, log in to the Amazon Vendor Central portal. You’ll be asked to select the Vendor Central account you want to connect. Choose the correct account and proceed.

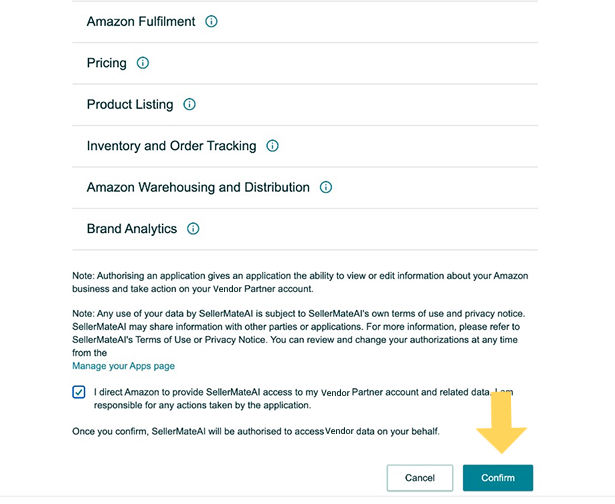
5. Grant Necessary Permissions
Amazon will display the permissions requested by SellerMate.ai. These are essential to fetch your vendor data — note that SellerMate.ai only reads data and doesn’t make any changes to your account.
Click Allow Access to continue.
6. Confirmation & Data Syncing
Once the permissions are granted, you'll be redirected back to SellerMate.ai.
A success message will pop up confirming that your Vendor Central account is now connected. The system will now begin syncing your data with the selected ad account.
Syncing may take 2 hours. You’ll see a tick icon next to your ad account once the Vendor Central data is linked.

Want to Connect Multiple Vendor Accounts?
Please note: 1. You can only connect one Vendor Central account at a time to each ad account. If you want to connect more, simply repeat the process above for each account.
You need to connect your Ads account first before linking your Seller Central or Vendor Central account.
Free Trial & Subscription Info
✅ SellerMate.ai offers a 1-month free trial
✅ No credit card required
✅ Cancel anytime before the trial ends to avoid charges
Final Thoughts
Connecting your Amazon Vendor Central account to SellerMate.ai is a key step toward unified campaign intelligence and better decision-making. It just takes a few minutes — and if you follow the steps above, you're good to go.
👉 Also check out: How to connect your Amazon Seller Central account with SellerMate.ai


Comments